Felted Crochet Bag: The Patriot Purse
***Picture Heavy Post***
Well, this is how you all saw it the last Friday. The Patriot Purse had laid in this condition/state for over two weeks and I knew it was time to finish it.
 After I worked in the las two rows of red stripe using Patons Merino Wool in red and Yarn Bee Eyelash held together around the top of the bag I did a few rows of just the wool. Decreasing in each round to make the top of the bag come in a little.
 When it had reached a point that I thought was sufficient enough to get things in and out pretty easily but still not be so open that a perfect stranger could reach in while I carried my bag I stopped. Then, I changed up the color to Patons Merino in denim blue (used also when I did the Yarn Bee Eyelash in blue) for the last round of wool before I started the handles.
 This is a picture of one handle finished and the opposite one needing to be stitched to the other side of the purse.
  I wasn't sure if this purse was going to need a magnetic fastener or not but I figured it was easy at this point to add the extra flap at the top of the purse to include a fastener if I chose to. Here are a few pictures of that process.


There you go, now that the flaps had been added they needed to be sewn down to the inside of the bag. ONLY ON THE BOTTOM, NOT ON THE SIDES as that is where you will have to insert your fingers to close the clasp of the magnetic fasteners post felting(more pictures of that later). Recap, DO NOT SEW THE SIDES!
 At this point, the purse was ready to felt. I had tucked in all the yarn (very important when felting) and I was ready to go.
 Actually, when I was looking at the Patriot at this point I noticed how great it would look just like that. With a patriotic printed fabric on the inside as a sewn in lining...very cool! I think when I write this pattern I will definitely add a version un-felted and lined.
 Just another shot of the purse on the lovely green grass my hubby had just mowed!
It was time to felt but I had to make sure to take some pre-felting measurements...
 Base: 11"
 Width: 17"
 Height: 13"
Okay, ready to go in the Hot Water...
 Am I ready for this? It did look really good un-felted. I could just go get some cool fabric and line it...no, I have to felt...
Here goes...
 Half way through first cycle...I am not happy with the way it is turning out. The Yarn Bee Elf Eyelash is not showing up the way I thought it might. The red wool is really showing through the white. I am going to let it go another round and see if that helps.
 Well, the second round didn't really improve on the way the Yarn Bee Elf Eyelash looked but what am I going to do now about it? Nothing...moving on...fasteners.
Remember when I mentioned NOT to sew the sides only the bottom? Well, you are going to see why. I like to add my magnetic fasteners when the purse is still damp. Not really sure why other than I think it is easier to push the clasps through it when it is still damp.
Get ready for a "how to" told in pictures...
 Get the fasteners at any craft store.
 Wiggle your finger in between the purse and the flap you made just for this fastener. It might be a little tough but don't be easy on it...that thing needs to open!
 Place the magnetic fastener on the flap and push the prongs through the flap but not through the other side of the purse (this is why you need a flap in the first place and why you need to be able to get your fingers in between the flap and the purse). When it is pushed through,
 slid the second piece that comes with the fastener behind the flap and fit it over the prongs. As you can see, there are slots in the second piece indicating where the prongs should go. Again, all this is done by feel with your fingers between the flap and the purse.
 When the second piece is properly positioned flatten out the prongs like you would do on a manilla envelope and you get this!
On the other side of the purse it is important that you make sure the fasteners line up. So, what I do is match them together before I start to push the prongs through the other flap. When the puncture is visible, I separate the fasteners and do exactly what I did on the first one.

 Perfect fit...
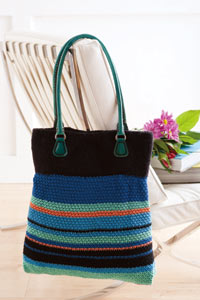
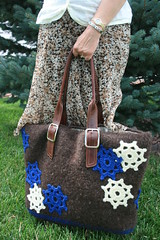
 And here is the finished Patriot Purse...
 Base: 7"
Width: 10"
Height: 10"
Verdict: I really like the purse design. However, I am not particularly pleased with the felting process of the Yarn Bee Elf Eyelash. Maybe if I had held a white wool with it instead of the red it would look better. But right now, to me anyway, the white part looks like little whiskers.
As for the Yarn Bee Eyelash I am always really pleased with how that turns out when I felt with it. Because the eyelashes are not as long as the Lion Brand Fun Fur ones I think the bag has a little more of a cleaner look (not wild and out of control).
As for the Patons Merino Wool I still love it. It felts up really nicely and still no complaints.
I will make this purse again only next time I think I will change up the colors and maybe not add any eyelash. Let the wool do all the color work. That is was is so great about bags...the possibilities are endless!
I hope you like the purse and the magnetic fastener tutorial helps.
Let me know what you think.
Let me know what you think.


11 comments:
It's funny how we are our own harshest critics. I think the bag looks great! I've always liked the look of eyelash yarn on a felted project.
Thanks for the tutorial, Marly! Looks great! :)
Look at you! Great tutorial! Keep it up and we'll be waiting to order your book on felting purses!
:)
I really like the bag. I'm newly fixated on felting since I made my hedgehog. I'm thinking that at some point, I'll be making one.
Hope to see you Saturday!
very cute.. so American :) I'll be in Colorful Colorado in two short months for 4 glorious weeks..WOOOHOOOO. have a great weekend...
oo.. you just left me a comment too.. too funny at the same time ;)
The bag is perfectly lovely and I'm so impressed with your energy level... all those photos and detailed instructions! You rock! I'm really looking forward to the purse website getting going. After all... "a girl can never have too many handbags"! Speaking of which... do you belong to the yahoo group by that name? It's fun and inspiring!
Great job! The bag is beautiful! Well done!
Random question: do you knit continental? I've heard crocheters say knitting continental makes sense to them because holding the yarn in the left had just feels *right*. Just curious.
Okay back to lavishing praise...I really liked how this post captured that "point of no return" anxiety when you throw your hard work in the washer for felting. And the tutorial was crystal clear. Good job!
Good luck with your new website!
Wowsers! What a great tutorial! I love the bag design--I can just see one in green and blue... :)
I am so impressed. I love the bag and you did a wonderful job on it. Great Tutorial. It looks even better in person.
The clasp info was great! Always something new to learn.
Thank you!
Post a Comment