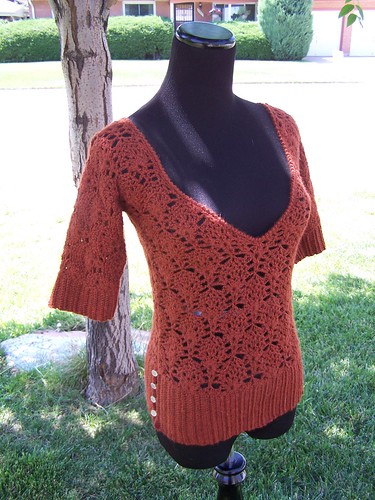
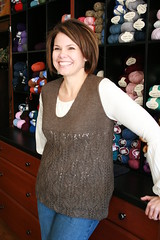
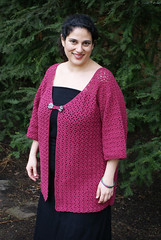
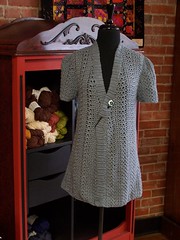
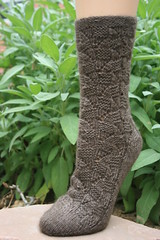
Tatiana Pullover

Tatiana Pullover
Finished Sizes: 32½ (39, 45½, 52, 58½)" bust circumference, length measure 24½ (26, 29, 30½, 30½)". Garment shown measure 32½" with ½" negative ease.
Yarn: Blue Sky Alpacas Mélange (100% baby alpaca; 110 yd [100 m]/1¾ oz [50 g]): #804 cinnamon, 7 (9, 12, 14, 16) skeins.
Hook: Size F/5 (3.75 mm). Adjust hook size if necessary to obtain correct gauge.
Notions: Stitch markers (m); yarn needle; 1½ yd ⅜" wide grosgrain ribbon; eight ¾" decorative buttons.
Gauge: 1 st rep = 3¼" in lace patt; 1 row rep =3" in lace patt.
I have been really busy designing lately that I have forgotten to keep all of you up to date on what patterns have been released and where! Well, it is a little late new now but I had a design in the Winter 2009 issue of Interweave Crochet.
My motivation behind this design was to design a garment that was easy on construction but intricate in pattern stitch. Also, I think the little buttons really make this piece cute.
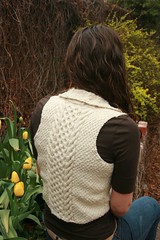
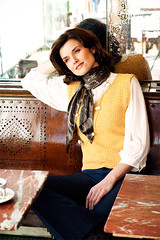
The entire sweater is made in one piece! (pause for a cheer) As for the fit, it is meant to be a very tight fitting sweater and because it is made out of alpaca I wanted to make sure it wouldn’t stretch out of shape after wear (you know what I mean?) Also, because I wanted the lace to really get stretched across the body (and boobs) to show the stitches and not look like a blobby mess…does that make sense? I say all of that to let you know what I was thinking when I wrote the pattern.
I wrote the pattern to have a 2" negative ease. The picture in IC shows it with a 1/2" negative ease so please keep this in mind if and when you decide to crochet it.
The neck line originally was supposed to plunge a lot more than it shows on the model but I had to change that. See, I had finished the pullover and turned it in to IC and mentioned that I was worried that the neckline would stretch too much both in the front drop and off the shoulders once it was worn. They agreed and allowed me to take it home and try to remedy the situation.
What was my solution? Well, I remembered a class I took with Robyn Chachula (my favorite crochet designer) and the suggestion to use grosgrain ribbon to help prevent unwanted stretch. PERFECT! I took the piece home, added a couple more rounds of single crochet, hand stitched grosgrain ribbon around the neck and voila! No more unwanted stretch :-) Thank Robyn!!!
It has gotten a great response on Ravelry which I was very pleased about...and then I got the dreaded PM about MISTAKES!!! Yep, they happen and I know that. By the time a pattern is printed in the magazine it has been looked at and tweaked by so many people that mistakes are almost inevitable. The written pattern in the magazine has a few mistakes. But have no fear...I am here to tell you what they are :-)
Here is the exact information I wrote in on the pattern page in Ravelry in case some of you are not a part of the site (and if you aren't what are you waiting for?)
ERRATA
:
For Neck Shaping the pattern should read: work to specified # of rows then place marker in center ch-2 sp
Row 1: Work as est to marked sp, dc in marked sp, turn.
Row 2: ch 3, sc in 2nd ch-1 sp, ch 2, sc in next ch-1 sp, work as est to end.
Row 3: Work as est to last ch-2 sp, sc in last ch-2 sp, turn.
Row 4: ch 3, sc in 2nd ch-2 sp, ch 2, sc in next ch-2 sp, mark 1st ch-2 sp just created, work as est to end.
Rep rows 1-4 twice more for neck shaping.
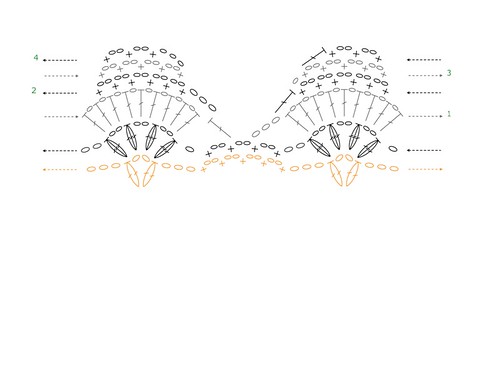
To make it even easier here is a chart to help...
 The Join Back of Neck and Sleeve shaping and Back should read like this:
JOIN BACK NECK Next row (WS): Work as est to end of row, ch 42, then work as est across Right Side of Neck sts. Work evenly as est across all sts for 12 (16, 16, 20, 20) rows. Fasten off.
BACK With RS facing, join yarn with sl st 2½ reps of Lace pat into the fabric, or at 1st body (non-sleeve) st. Next row (RS): Work as est across 5 (6, 7, 8, 9) reps of Lace pat, turn. Work evenly as est for 35 (35, 35, 43, 43) more rows. Fasten off.
There is even a thread in the Interweave Crochet group on Ravelry to help if you need more instructions.
In the end, I think the pattern turned out really nice. Not bad for my first garment in
Interweave Crochet, right? Here are a couple of pictures of it on my dress form to show you how it would look on a bustier person.
Enjoy!


2 comments:
Another beautiful, gorgeous creation! Fabulous job!!!
Holy Crap! You must have a creative engine running in your brain! This is beautiful and another tip learned for me.
Thanks Marly
Post a Comment